Music Production Workflow: 9 Steps From Idea to Release
A practical music production workflow from first idea to release: nine steps, the mistakes that stall each one, and where AI speeds up drafting and lyrics.
A music production workflow is the fixed order in which you take a song from a captured idea to a released master: capture, write, arrange, produce sounds, record, edit, mix, master, release. The order matters less than finishing each stage before you judge the next. Most unfinished songs stall because the producer mixes a loop that has no structure yet. Below are the steps, what each takes, where it usually goes wrong, and where AiEnvoy’s AI Music Generator gets you to a first draft in less time.
TL;DR
- The core sequence is capture, write, arrange, sound design, record, edit, mix, master, release. Stages overlap in practice, so treat the sequence as a guide.
- Finish structure before you mix. Mixing too early splits your attention between creative and technical decisions.
- Save a template, name your tracks and keep versions. Setup work should never eat the hours you set aside for music.
- Draft fast. A rough demo with lyrics and a reference is enough to start. AiEnvoy generates songs and lyrics so you can test ideas before you commit studio time.
- Plan the release early. Distribution, artwork and metadata take longer than most producers expect.
Table of Contents
- What a music production workflow is and why it works
- The nine steps at a glance
- Step 1: Capture the idea before it disappears
- Step 2: Write the song
- Step 3: Build the arrangement
- Step 4: Choose the sounds
- Step 5: Record and track
- Step 6: Edit the recordings
- Step 7: Mix
- Step 8: Master
- Step 9: Release
- Habits that make every step faster
- Adapting the workflow to your project
- Where AiEnvoy fits in the workflow
- Perspective
- FAQ
- Sources
What a music production workflow is and why it works
Production covers everything between inspiration and a track listeners can stream. Avid describes it as composing, arranging, recording, editing, mixing and mastering, with the goal of a polished track ready for distribution. A workflow is your repeatable way through those stages.
It helps for three reasons. First, it separates jobs that need different mindsets. Writing is generous and loose. Editing and mixing are critical and precise. Mayzes recommends separating writing, performing and editing so each gets your full focus. Second, it removes recurring decisions: where files go, which template you open, what comes next. Third, it makes finished songs a habit rather than an accident, and a body of finished work is what builds an audience.
The common frameworks differ only in how they slice the same road. Waves lists six stages: songwriting, arranging, tracking, editing, mixing and mastering. MusicRadar groups DAW work into composing, arranging, and mixing and mastering. The version below has nine steps because release belongs in the workflow too.
The nine steps at a glance
| Step | Goal | Common mistake |
|---|---|---|
| 1. Capture | Save a loop, chord progression or drum break | Waiting for a “perfect” idea |
| 2. Write | Turn the idea into a song with melody, harmony and lyrics | Polishing sounds before the song exists |
| 3. Arrange | Decide what plays in each section | A loop that never becomes a song |
| 4. Sound design | Choose instruments and tones | Endless preset browsing |
| 5. Record | Capture performances and vocals | Over-analyzing every take |
| 6. Edit | Comp, clean, fix timing and pitch | Over-correcting the feel out of it |
| 7. Mix | Balance the tracks so they fit together | Mixing in isolation |
| 8. Master | Finalize the stereo mix | Piling on processing |
| 9. Release | Distribute, tag and schedule | Starting the paperwork the week of release |
Step 1: Capture the idea before it disappears
Start by getting any musical idea into the session. Reason Studios’ Kato advises capturing a loop, chord progression or drum break first, then developing it into a song. Speed is the point here. A phone memo, a four-bar MIDI loop or a hummed melody all count.
What goes wrong: producers hold ideas to a high standard at the moment of capture, so nothing gets saved. Keep a single folder for raw ideas and do not judge them on arrival.
This is where AI helps most. If you have a mood, a genre and a few lines of text but no instrument in reach, AiEnvoy’s music tools can turn that brief into a draft track you can react to. A draft that exists beats a perfect idea that does not.
Step 2: Write the song
An idea becomes a song when it has structure, melody, harmony and, if it has vocals, words. Berklee Online’s home-studio course describes a practical workflow that develops structure, melody, harmony and arrangement first, before tracking begins. The same material notes that during pre-production the sonic quality of early recordings can take second place to song development, so melody, harmony and rhythm get solved before you worry about recording technique.
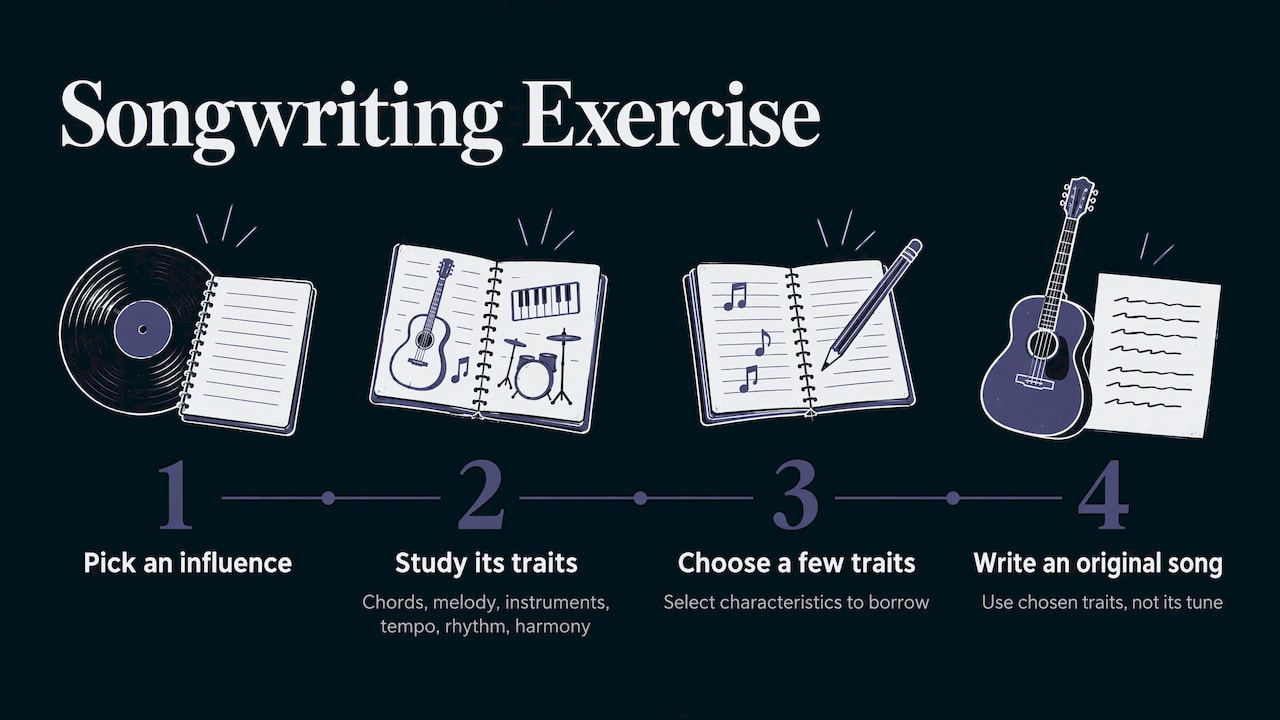
A useful writing exercise comes from Mayzes: pick an influence, study its chord structure, melody, instrumentation, tempo, rhythm and harmony, then write an original song using a few chosen characteristics. You borrow a approach, not a tune.
What goes wrong: lyrics are the stall point for many producers. AiEnvoy includes AI lyric generation alongside song creation, so you can get a full set of lyrics on the page, rewrite what does not sound like you, and keep moving. Treat generated lines as raw material to edit.
Step 3: Build the arrangement
Arrangement answers one question: what plays when? Take a short loop and decide what happens in the intro, verses, choruses, bridge and outro, and where contrast comes from. Contrast can be an instrument dropping out, a new harmony, a change in density or a filter opening.
Some DAWs help you separate sketching from arranging. MusicRadar’s explanation of Ableton Live’s two views shows a non-linear session view acting as a sketchpad for clips, while the arrangement view puts chosen ideas on a timeline so you can judge form and development. Whatever DAW you use, the principle holds: explore freely, then commit.
What goes wrong: the eight-bar loop that never leaves loop mode. Set a rule that you move to a full-length structure within one session, even if it is crude. Many producers also find it quicker to arrange from a reference song’s section lengths.
Step 4: Choose the sounds
Sound design is optional when presets will do. EDMProd’s workflow guide lists it as a stage to use when needed, which is a healthy way to look at it. List the instruments and tones the song needs, pick them, and move on.
The Record Shop Nashville’s pre-production advice is a good checklist for this step: make a simple demo, define the sonic character with reference recordings, choose instrumentation, and work out sections and dynamics before you record.
What goes wrong: preset browsing eats an evening and the song does not move. Give yourself a fixed number of minutes per sound and a shortlist of three.
Step 5: Record and track
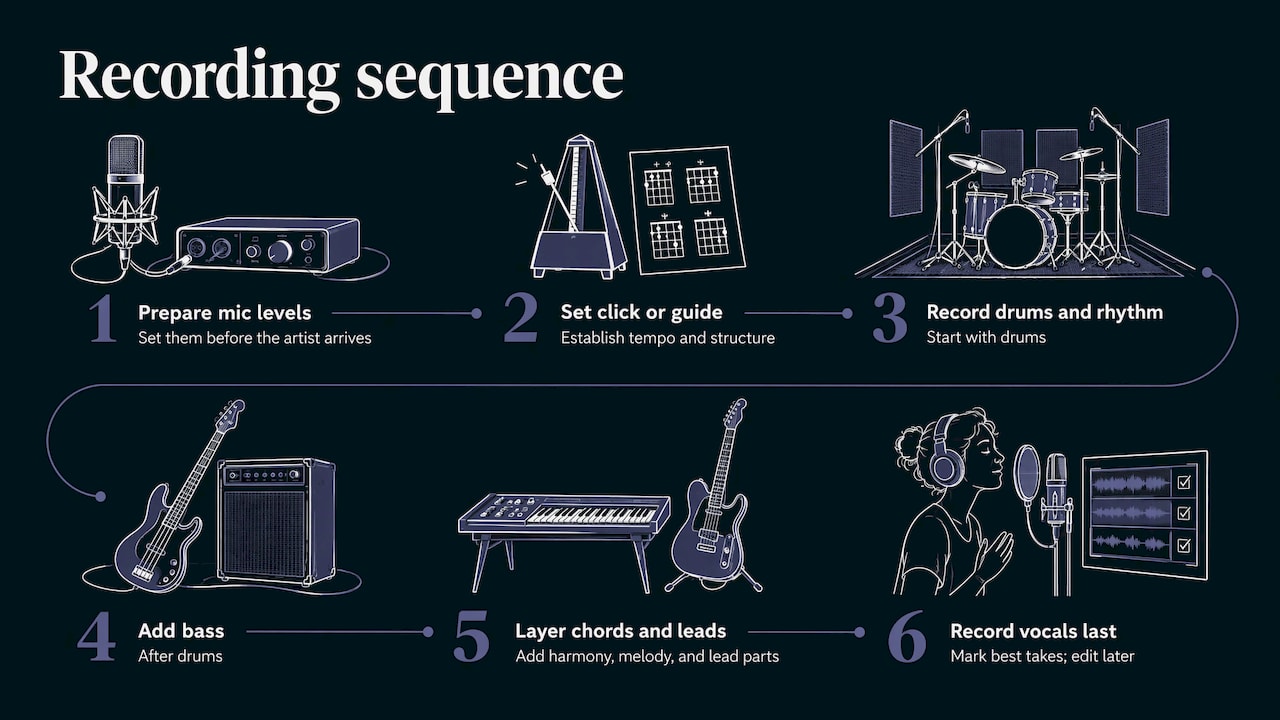
Recording is where your preparation pays off. For a finished song built from scratch, Mayzes suggests a DAW click track, starting with drums, then bass, then chords and melodies, with vocals last. He notes that electronic music is often recorded during writing, so the line between steps blurs. Avid suggests a guide track, a simple rhythm or chord progression that sets tempo and structure, and then layering rhythm instruments, bass, harmony, lead parts and vocals.
Prepare before the session. Kato recommends setting microphone levels before the artist arrives and keeping a good take instead of over-analyzing, because too much analysis stalls the session. If you are rehearsing with a band, strip the song down and rebuild it first so you are not paying for studio time while you decide on a bridge. MusicGurus makes that same point about pre-production.
What goes wrong: chasing one flawless take. Record several, mark the best, and edit later. If you are a solo artist working on vocals, AiEnvoy’s music tools include vocal recording, so you can lay down a guide vocal over a generated or self-made backing track and hear the song working before you spend on a proper session.
Step 6: Edit the recordings
Editing cleans the raw material: comping the best parts of several takes, removing noise, and fixing timing and pitch where the style calls for it. iZotope’s overview of audio production describes editing in just those terms.
A good order, from Mayzes: fix drum hits and align the overheads first, line other parts up to the drums, then comp, tune and time-correct vocals and automate clip gain. He also warns that editing is genre-sensitive. Mainstream styles often benefit from substantial timing and tuning work, while a genre like jazz may be harmed by heavy correction.
What goes wrong: grid-perfect everything. If the part feels right, leave it.
Step 7: Mix
Mixing balances the individual tracks so they work together. iZotope’s mixing-versus-mastering guide defines mixing as balancing individual tracks, which is the cleanest description you will find.
A sequence that works on most projects:
- Prepare the session: label, group, color-code, clear junk.
- Set static levels with faders only.
- Use subtractive EQ to clear muddiness, as Reason Studios presents it.
- Add compression, saturation and texture where the song needs it.
- Build space with panning, reverb and delay.
- Automate volume and effects.
- Run final checks on other speakers and at low volume.
Mayzes’ eight mixing steps follow almost the same path: preparation, volume balance, compression, EQ, space, volume automation, effects and final checks.
Two principles save time. First, mix in context. Andrew Scheps advises against optimizing isolated tracks, and suggests bringing vocals in early so the arrangement leaves room for them. Second, do not start mixing before production and arrangement are done. Early mixing divides your creative attention before the structure is settled.
What goes wrong: self-mixing reduces objectivity. Mayzes recommends involving other listeners for exactly that reason. Play your mix for someone and ask what they hear first.
Step 8: Master
Mastering works on the finished stereo mix as one audio file, not on individual tracks. Avid explains that it makes subtle adjustments for cohesion and reliable playback across different systems. iZotope’s guidance on mastering names EQ, compression when needed and peak limiting as the basic tools, and warns that more processing makes over-processing easier.
The final job also includes loudness, consistency across tracks, metadata, export and a last quality check, per iZotope’s breakdown. If you are releasing an album or EP, check balance and consistency across the whole collection, not one song at a time.
What goes wrong: using mastering to fix a mix problem. If the vocal is buried, go back to the mix.
Step 9: Release
A finished master is not a released song. Yamaha Creator Pass recommends uploading the final master to a distributor, completing metadata, adding artwork and scheduling the release. Its guide suggests scheduling two to four weeks ahead to leave time for artwork, metadata and playlist submissions.
Build a release checklist once and reuse it: final WAV, cover art at the required size, song titles and credits, release date, and a few promotional posts. This is also where a content creator’s job grows beyond audio. A song release needs a cover, teaser clips and often a lyric or visual video. AiEnvoy puts music, image generation and video generation in one place, which means the release assets can come from the same workspace as the song.
Habits that make every step faster
Save a template
Waves recommends saving recurring DAW routing, such as buses, groups, sends, returns and repeated effects, as a default template so you do not rebuild the same setup for every project. Templates are best for repetitive technical work. They free your attention for musical decisions.
Name, color and version
Name every track, color-code groups, and save a new version at each milestone, such as sketch, arrangement lock, rough mix and final mix. Keep a short next-action note at the top of the session so tomorrow’s first minute is not spent remembering where you stopped.
Use references
Pick one or two finished songs in your genre and compare against them at the sketch, mix and master stages. A reference gives you a target instead of a feeling.
Keep the order flexible
The workflow is a map, not a law. MusicRadar’s beginner guide advises keeping composing, arranging and mixing flexible rather than rigidly isolated, and customizing your DAW workflow to your own music. EDMProd’s Sam Matla makes the same argument in his workflow guide: a workflow should not force every producer or genre into one fixed order. An electronic producer may record while writing. A singer-songwriter may finish the lyric before touching a DAW.
Adapting the workflow to your project
The nine steps compress or expand with the job.
- A solo electronic track: capture, write and arrange often happen in the same session. Sound design carries more weight, and recording may be only a few synth takes.
- A band song: pre-production and rehearsal carry the most value. Track drums first, vocals last, edit with a light hand.
- A short-form video soundtrack: you may need only capture, a quick arrangement and a light mix. Speed matters more than depth.
- An album: add a consistency pass at the end, so level, tone and spacing between songs feel like one body of work.
Whichever project it is, the test from Scheps still applies: the listener should notice the performance and the song before any isolated technical detail.
Where AiEnvoy fits in the workflow
The early steps, capture, write and arrange, are where producers lose the most momentum. AiEnvoy’s AI Music Generator creates songs and music tracks, with AI lyric generation and vocal recording built in. You can draft a track from a brief, test a chorus idea, hear a lyric sung, and decide which direction deserves your DAW time.
If you also publish video, the rest of the release kit is in the same studio: cover art through the image generator, teasers through the video tools, and reusable AI characters if you want a consistent visual identity across clips. You can browse the templates library for ready formats, and AutoPilot automates content creation and scheduling once the song is out.
There is a Free plan at 0 USD per month, so you can try the music tools on your next sketch. Premium and Token Packs are on the pricing page.
Perspective
We built AiEnvoy around a simple observation: the hardest part of a music workflow is rarely the mix. It is the gap between having a feeling and having something you can listen to.
That gap is why so many ideas die in the first hour. A producer who can hear a draft quickly, with lyrics and a vocal, makes better decisions about the arrangement, the sound palette and what is worth recording properly. Our music tools are designed for that stage: describe the song, get a track, edit the words, hear it again.
We also think creators should not need five tools for one release. A song needs a cover, a teaser and often a video. Keeping music, image and video generation in one app means the release assets come from the same session as the song, instead of from a scattered set of subscriptions.
Your workflow is yours. Use ours to shorten the distance from idea to demo, then take the song as far as you want.
the author
FAQ
What are the main steps in music production?
The usual sequence is capturing an idea, writing the song, arranging it, choosing sounds, recording, editing, mixing, mastering, and releasing. Yamaha Creator Pass lays out a similar nine-step path from idea to promotion. The stages overlap, so adjust the order to your genre and tools.
Should I mix while I’m still arranging?
It is better to finish the arrangement first. Mixing early divides your attention between creative and technical choices before the song’s structure is settled. A rough balance to hear the song clearly is fine, but save detailed EQ and compression for the mix stage.
What is the difference between mixing and mastering?
Mixing balances the individual tracks of a song. Mastering finalizes the stereo mix for distribution, with attention to loudness, tonal balance, consistency, metadata and export, as iZotope describes it. Mastering also checks that the song translates across playback systems.
How far ahead should I plan a release?
Yamaha’s guide suggests scheduling two to four weeks ahead so artwork, metadata and playlist submissions are not rushed. Start the checklist when you begin mixing, not after mastering.
How can AI speed up a music production workflow?
It shortens the early steps. With AiEnvoy you can generate a draft song, write lyrics with AI help and record vocals, then judge the idea before investing in a full session. The same studio produces cover art and video clips for your release.
Sources
- Avid: Music Production, A Complete Guide
- Waves: The 6 Stages of Music Production
- MusicRadar: DAW workflow for beginners
- Mayzes: How to Make an Album
- Reason Studios: Music Production Workflow with Kato
- Berklee Online: Writer, Engineer, Producer in the Home Studio
- Mayzes: How to Write, Record and Mix Music
- MusicRadar: Ableton Live Session View vs Arrangement View
- EDMProd: Workflow, The Complete Guide
- The Record Shop Nashville: Three steps to effective pre-production
- MusicGurus: How music production works
- iZotope: What is Audio Production?
- iZotope: Mixing vs mastering
- iZotope: 10 tips for mastering
- Mayzes: Mixing Music 101
- Waves: Andrew Scheps on Serving the Song
- Waves: DAW workflow tips
- Yamaha Creator Pass: Music Production Workflow
Recommended
Put this workflow into practice with AiEnvoy
Create videos, AI music, and multi-language dubbing with Sora, Kling, Veo, and Seedance 2.5 — or connect our Developer APIs.